Level 1Unit C · Session 17
17

Unit C · Circuits and sensing

First blink

What we are making: a light on the board that turns itself on and off, over and over — and then we change how fast it does it.
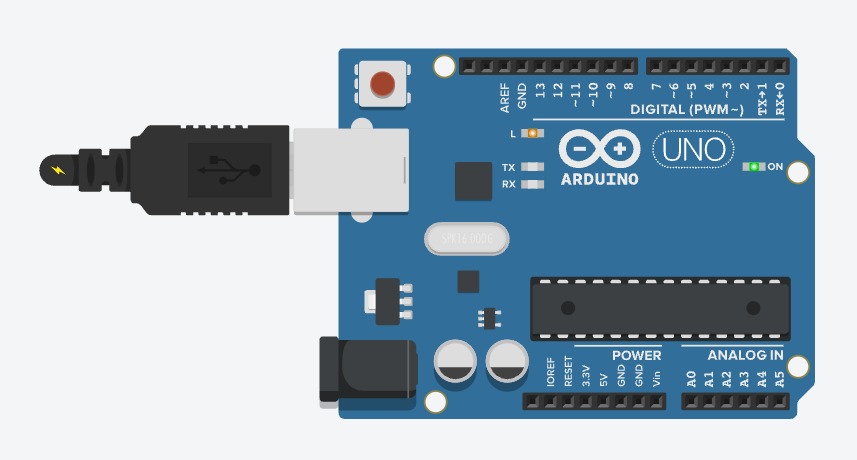
Photo: an Arduino board plugged in by USB with its small orange LED lit

The idea

The board is a tiny computer that does nothing until you give it a program. You build the program here, upload it down the cable, and from then on it lives on the board — unplug the computer and it keeps going.

New words
ProgramA list of instructions, done in order.
UploadSending the program from the computer into the board.
Forever loopA block that repeats everything inside it, without ever stopping.

Wire it up

Nothing to wire. The board has its own small LED on pin 13, fitted at the factory.

1
Arduino board
1
USB cable
1
Computer with mBlock
  1. Plug the small end of the USB cable into the board and the big end into the computer.
  2. A green light comes on and stays on. That is the power light — it is not yours, and it is not the one we are going to blink.
  3. Open mBlock.
  4. Click Connect at the top, and choose your board from the list that appears.
🔧 If it goes wrong
If no board appears in the list, the most likely cause is the cable. Some USB cables are for charging only and have no data wires inside. Swap the cable before you change anything else.
Pins used13
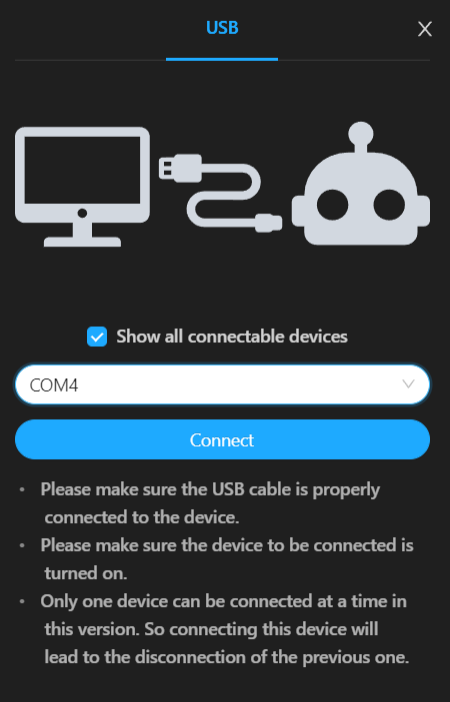
Screenshot: mBlock with the Connect dialog open, showing the board selected

The code

Clip these together in this order. The four middle blocks sit inside the forever block.

Your program
when the board starts up
forever
set digital pin (13) to HIGH
wait (1) seconds
set digital pin (13) to LOW
wait (1) seconds

What each block is doing

  • when the board starts up — everything below this runs the moment the board has power.
  • forever — repeat everything inside me, without ever stopping.
  • set pin 13 to HIGH — HIGH means on. Send electricity to pin 13. The LED lights.
  • wait 1 seconds — do nothing at all for one second. Without this, the next instruction happens instantly and you would never see the light change.
  • set pin 13 to LOW — LOW means off. Stop sending electricity. The LED goes dark.
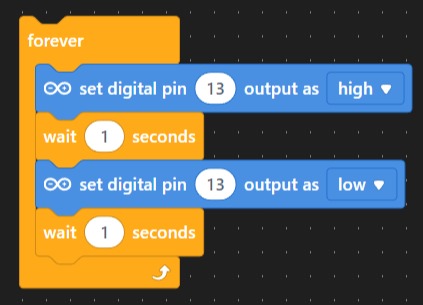
Screenshot: the finished blink program in mBlock, blocks assembled inside the forever loop
  1. Click Upload.
  2. Wait. A progress bar appears, and the board's lights flicker while the program transfers.
  3. Watch the small LED near pin 13.

Try it

What should happen: on for a second, off for a second, forever. Now pull the USB cable out and plug it back in. It starts again on its own — the program is on the board.

🔮 Try this
Change the two wait blocks from 1 second to 0.1 seconds and upload again. Now change them to 3 seconds. Then try making the ON wait short and the OFF wait long, so it flashes like a heartbeat.

If it goes wrong

What you seeWhyWhat to do
No board in the Connect listUsually a charge-only USB cable, or the driver has not installed yet.Try a different cable first. If that fails, unplug, wait ten seconds, plug back in.
Upload starts but fails part waySomething else is using the board's connection.Close the serial monitor window if it is open, then upload again.
Upload says it worked, but nothing blinksThe program probably went to the wrong pin number.Check the blocks both say pin 13, not 3 or 1.
It blinks far too fast to seeThe wait blocks are missing or set to 0.Make sure there is a wait block after both the HIGH and the LOW.

What you learned

  • A program is a list of instructions that run in order.
  • HIGH means on and LOW means off.
  • Without a wait, things happen too fast for a human to see.
  • Once uploaded, the program stays on the board.
Challenge optional — only if you finish early
  • Make the LED blink out your initials in Morse code. Short blink for a dot, long for a dash.
16. Show it