What we are making: something that moves — an arm that goes to
exactly the position you ask for, and stays there.
Photo: servo with a card arm taped to the horn, caught mid-sweep
The idea
Every output so far has had two states: on or off. A servo is different. You tell it an
angle between 0 and 180 degrees, and it turns to that angle and holds it.
Inside there is a motor, some gears, and a small circuit that constantly checks where the arm
actually is against where you asked it to be. If something pushes the arm, the servo pushes
back. That is why it feels stiff if you try to turn it by hand — and why you should not.
New words
ServoA motor that turns to an exact angle and holds it.
AngleHow far round, from 0 to 180 degrees.
HornThe white plastic arm that clips onto the top of the servo.
⚠ Careful
Never force the servo arm round with your fingers. You will strip the little plastic gears inside and the servo is then finished. Let the program move it.
Wire it up
1
Servo motor
3
Jumper wires
–
Card and tape
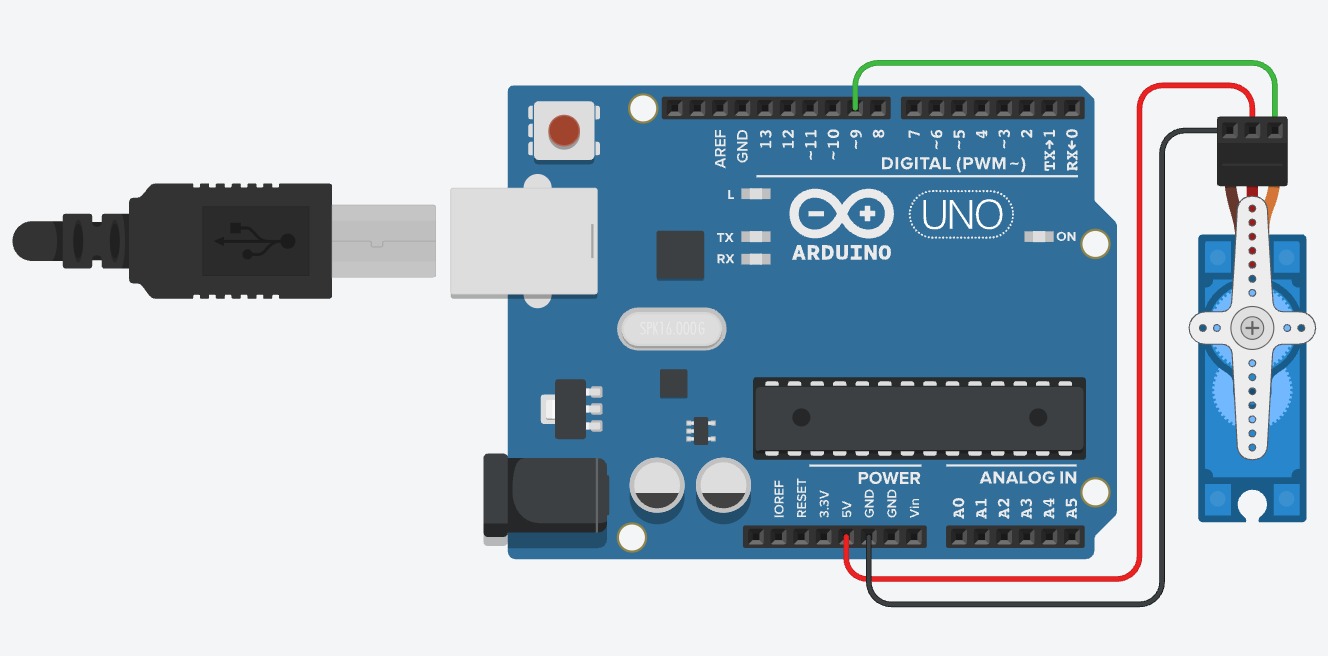
Three wires. The colours on a servo are almost always brown, red and orange.
Brown (sometimes black) is GND.
Red is 5V.
Orange (sometimes yellow or white) is the signal — run it to pin 6.
Clip a horn onto the servo, and tape a strip of card to it so you can see the movement clearly from across the room.
⚠ Careful
Getting brown and red the wrong way round will make the servo get warm and do nothing. Unplug immediately if you feel heat, and check the order before trying again.
Pins used65VGND
The code
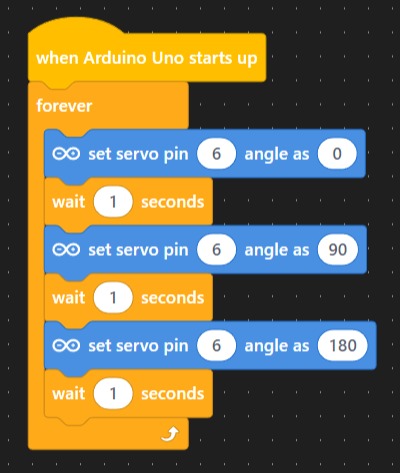
Start with a sweep, so you can see the full range it can reach.
Sweep test
when the board starts up
forever
set servo pin (6) angle to (0)
wait (1) seconds
set servo pin (6) angle to (90)
wait (1) seconds
set servo pin (6) angle to (180)
wait (1) seconds
Screenshot: mBlock servo angle blocks with the pin and angle set
Now give the positions names
"90 degrees" means nothing to anyone looking at your build. Decide what your three positions
are for, and write it down: closed, half open, wide open. A gate. A flag up or down.
Pick three angles that are useful for the thing you are making.
Test each one and adjust until it really is in the right place.
Write down your three numbers and what each one means.
Join it to the button
Bring back the button from Session 3, and make the servo move when it is pressed.
Button-operated gate
when the board starts up
forever
if < read digital pin (2) = HIGH > then
set servo pin (6) angle to (90)
else
set servo pin (6) angle to (0)
If it goes wrong
What you see
Why
What to do
Servo buzzes but does not move
It is being asked for an angle it cannot reach, or is short of power.
Keep angles between 10 and 170. Unplug anything else drawing power.
Jumps to one end and stays there
Signal wire is on the wrong pin.
Check the orange wire is really in pin 6 and the block says 6.
Twitches constantly
A loose signal wire, or the servo is at the very end of its range.
Press the wire home. Try 20 instead of 0.
Gets warm
Red and brown are swapped.
Unplug now. Rewire: brown to GND, red to 5V.
What you learned
A servo moves to an exact angle and holds it there.
Angles need names before they mean anything to a person.
Movement needs more power than a light, so wiring order matters more.
Never force a servo by hand.
Challenge optional — only if you finish early
Make the servo sweep smoothly from 0 to 180 instead of jumping.
Make it move to an angle that depends on the light sensor.