What we are making: a light that obeys you. Hold the button down and it
comes on. Let go and it goes off.
Photo: a hand pressing a button on a breadboard while the LED lights
The idea
So far the board has only talked to the world. Today it listens — and once a machine can
sense, it can decide. That is the if block.
The strange extra resistor
An unconnected pin does not read as off. It floats, picks up noise from the air, and flickers
on and off with nobody touching it. A second resistor from the pin down to GND holds it at off
until the button is pressed. That is a pull-down resistor.
New words
InputInformation coming into the board from outside.
OutputThe board making something happen outside.
if / elseA block that chooses between two things, based on something being true or not.
Pull-down resistorHolds a pin at off, so it does not float and give nonsense.
Wire it up
Keep last session's LED circuit exactly as it is. You are adding, not rebuilding.
–
Your circuit from Session 2
1
Pushbutton
1
Resistor 10kΩ
3
Jumper wires
The button straddles the gap in the middle. It only fits one way round.
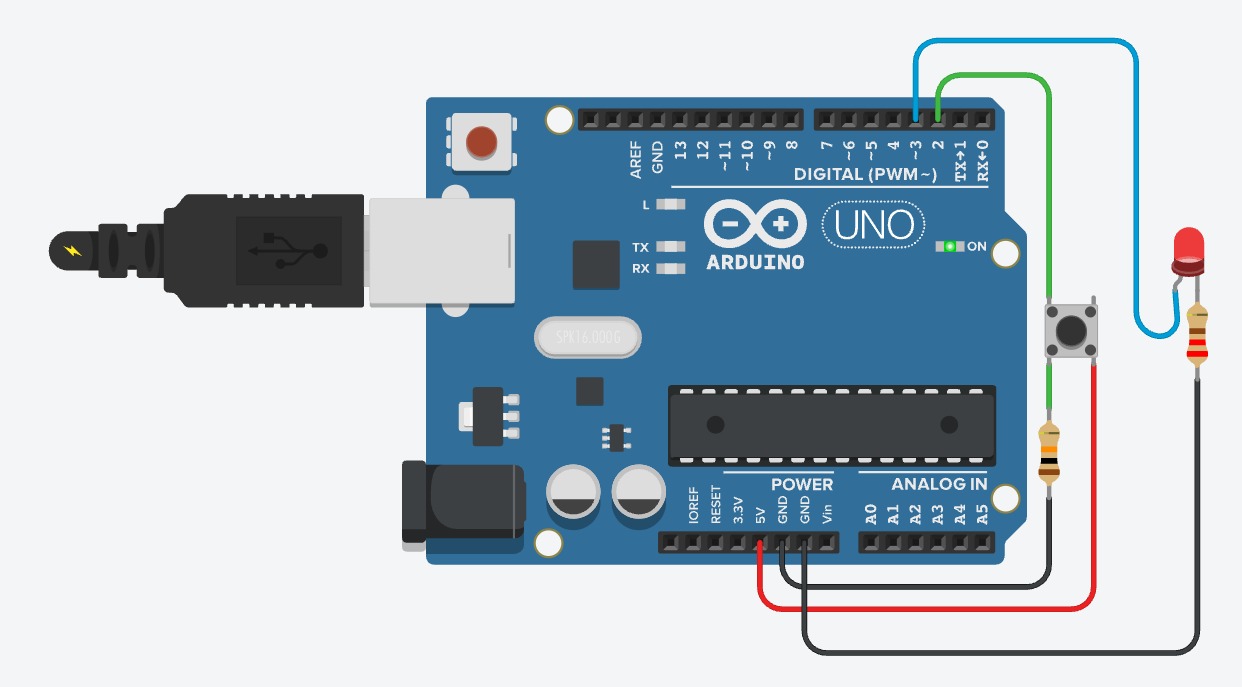
Push the button into the middle of the board at column 22 so its legs straddle the centre gap. It will only sit flat one way round — if it rocks, turn it 90 degrees.
Run a red wire from 5V on the Arduino to d22.
Run a green wire from c24 to pin 2 on the Arduino.
Push the 10kΩ resistor from a24 across to a28.
Run a black wire from b28 to GND.
⚠ Careful
Two different resistors are now on your board and they are not interchangeable. The small one (220Ω) protects the LED. The big one (10kΩ) holds the button pin down. Swapping them stops both from working.
Pins used925VGND
The code
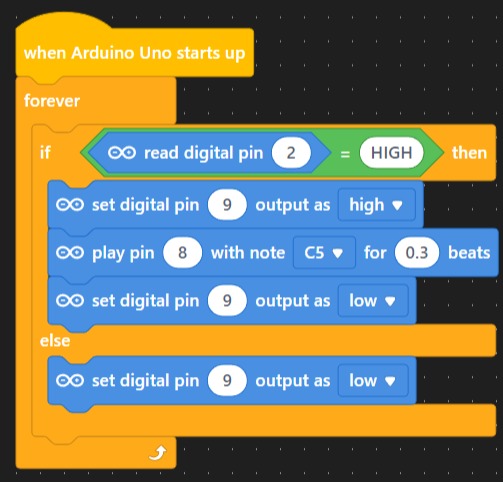
The forever loop stays. Inside it you now ask a question every time round.
Your program
when the board starts up
forever
if < read digital pin (2) = HIGH > then
set digital pin (9) to HIGH
else
set digital pin (9) to LOW
What each block is doing
read digital pin 2 — look at the button right now. It gives back HIGH if pressed, LOW if not.
if … then — ask the question. Only run the blocks inside if the answer is yes.
else — what to do when the answer is no.
forever — ask the question again, thousands of times a second. That is why it feels instant.
Screenshot: the if/else program in mBlock with the digital read block slotted into the if
Try it
What should happen: hold the button, the LED lights. Let go, it goes out. No delay you
can feel.
If it goes wrong
What you see
Why
What to do
LED flickers randomly with nobody touching it
The pull-down resistor is missing or in the wrong column.
Check the 10kΩ runs from the same column as the green wire, down to GND.
LED is on all the time
The button legs are bridging the gap the wrong way, so it is permanently connected.
Turn the button 90 degrees and push it back in.
Button does nothing at all
The green wire is in the wrong column, or on the wrong side of the button.
The wire must be on the same leg pair that the 5V wire is not on.
LED works but is very dim
Something is connected through the 10kΩ resistor by mistake.
Check the two resistors are in the right places, not swapped.
🔮 Try this
Make the LED stay on after you let go, and only turn off when you press again. This is genuinely difficult — the board asks the question thousands of times a second, so one press looks like hundreds of presses. Have a go and see what happens.
What you learned
Input is the world telling the board something. Output is the board telling the world.
An if/else block lets a machine choose between two things.
A floating pin gives nonsense, so we pull it down with a resistor.
The forever loop is what makes the machine feel like it is reacting instantly.
Challenge optional — only if you finish early
Make the button need a double press to work.
Then make holding it down do something different from tapping it.