What we are making: a doorbell. Press the button, and the machine answers
with a sound and a flash of light.
Photo: breadboard with LED, button and buzzer all wired together
The idea
A buzzer is another output, exactly like the LED. The board switches it on and off in
the same way. The difference is what your ears do with it.
Inside is a disc that flicks in and out. Slowly, you hear clicks. Hundreds of times a
second, the clicks blur into a note — faster switching, higher note. The play
note block does the switching for you.
New words
BuzzerAn output that makes sound by vibrating very fast.
NoteHow fast the buzzer is vibrating. Faster means higher.
💡 Tip
Some buzzers have a + marked on the top and one longer leg, exactly like an LED. If yours does, the long leg goes to the pin. If it has no marking, it works either way round.
Wire it up
–
Your circuit from Session 3
1
Buzzer
2
Jumper wires
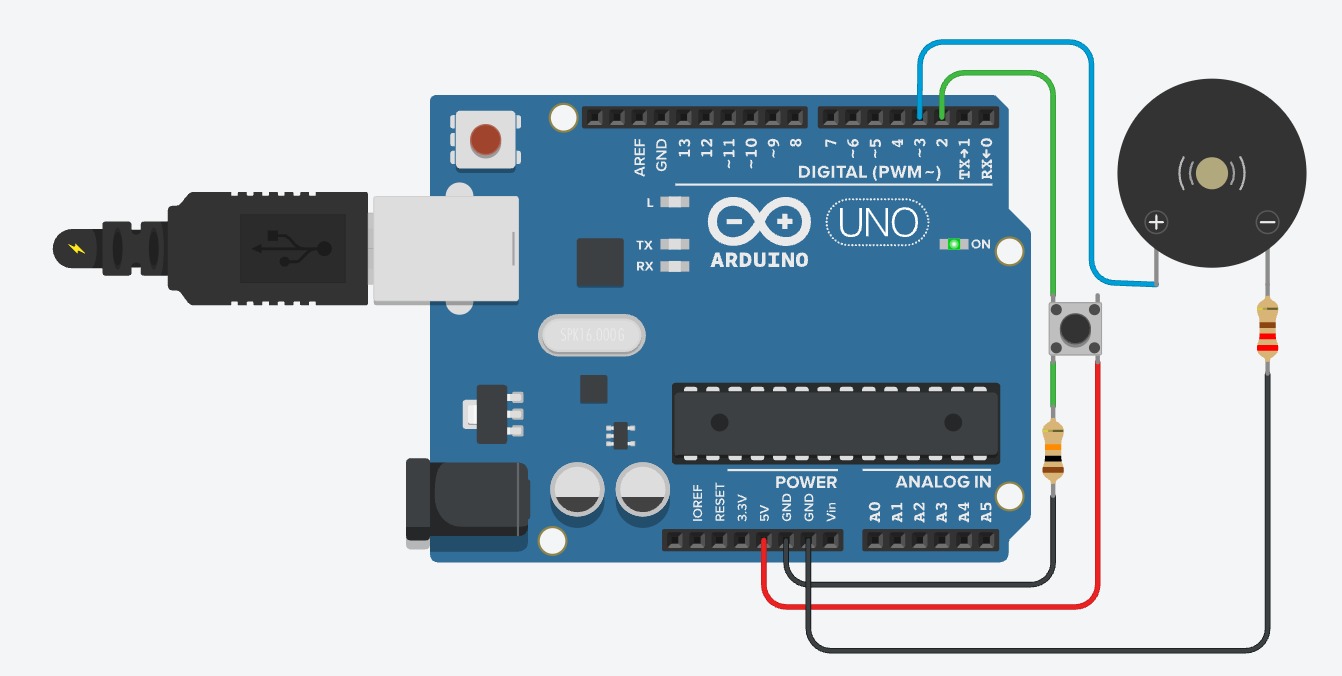
The buzzer goes at the far left, well away from the button, so nothing gets crowded.
Push the buzzer into the board at columns 4 and 6, near the left-hand end.
Run a yellow wire from the buzzer's + leg to pin 8 on the Arduino.
Run a black wire from the buzzer's other leg to GND.
Leave everything from Session 3 exactly where it is.
Pins used9825VGND
The code
Test the buzzer on its own first, so you know it works before you build the doorbell.
Test the buzzer first
when the board starts up
play note (C5) on pin (8) for (0.5) seconds
Now the doorbell. Button senses, if decides, and this time two things happen on yes.
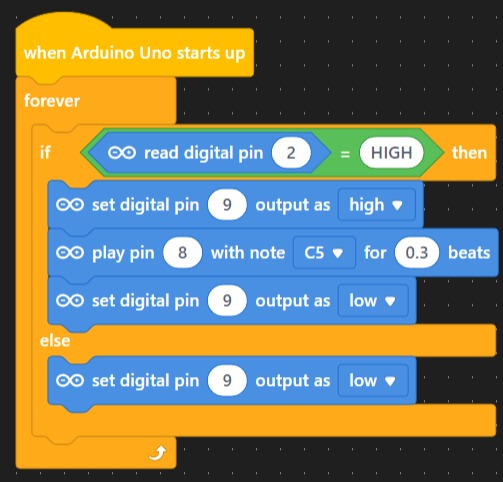
The doorbell
when the board starts up
forever
if < read digital pin (2) = HIGH > then
set digital pin (9) to HIGH
play note (C5) on pin (8) for (0.3) seconds
set digital pin (9) to LOW
else
set digital pin (9) to LOW
Screenshot: the doorbell program in mBlock, with two action blocks inside the if
Try it
What should happen: a short beep and a flash together. Hold it down and it repeats
— the forever loop keeps coming round.
If it goes wrong
What you see
Why
What to do
No sound at all, LED works fine
The buzzer is on a different pin from the one in your program.
Check the yellow wire really is in pin 8, and the block says 8 too.
A faint click instead of a note
It is being switched on and off, but not fast enough to make a note.
Make sure you used the play note block, not set pin to HIGH.
Sound is extremely quiet
Some buzzers are quiet by design, and a hand over the top muffles them.
Hold it up in the air. If it is still faint, try a different note — buzzers are louder at some notes than others.
It beeps constantly without the button
The button pin is floating again.
Check the 10kΩ pull-down from Session 3 is still in place.
🔮 Try this
Try three different notes and pick the one for your doorbell. Then think about this: which note is the most annoying after ten minutes? Real products have this argument too — a fire alarm is meant to be unbearable, a microwave is not.
What you learned
A buzzer is just another output the board switches on and off.
Sound is very fast switching. Faster switching means a higher note.
One if block can trigger several actions at once.
Testing a new part on its own first saves time when the full build does not work.
Challenge optional — only if you finish early
Play a tune on the buzzer — any tune, six notes or more.